
No-Knead Rosemary Garlic Artisan Bread
Prep time: 15 minutes
Rise time: 12–18 hours
Bake time: 40–45 minutes
Total time: About 13–19 hours
Makes: 1 large artisan loaf
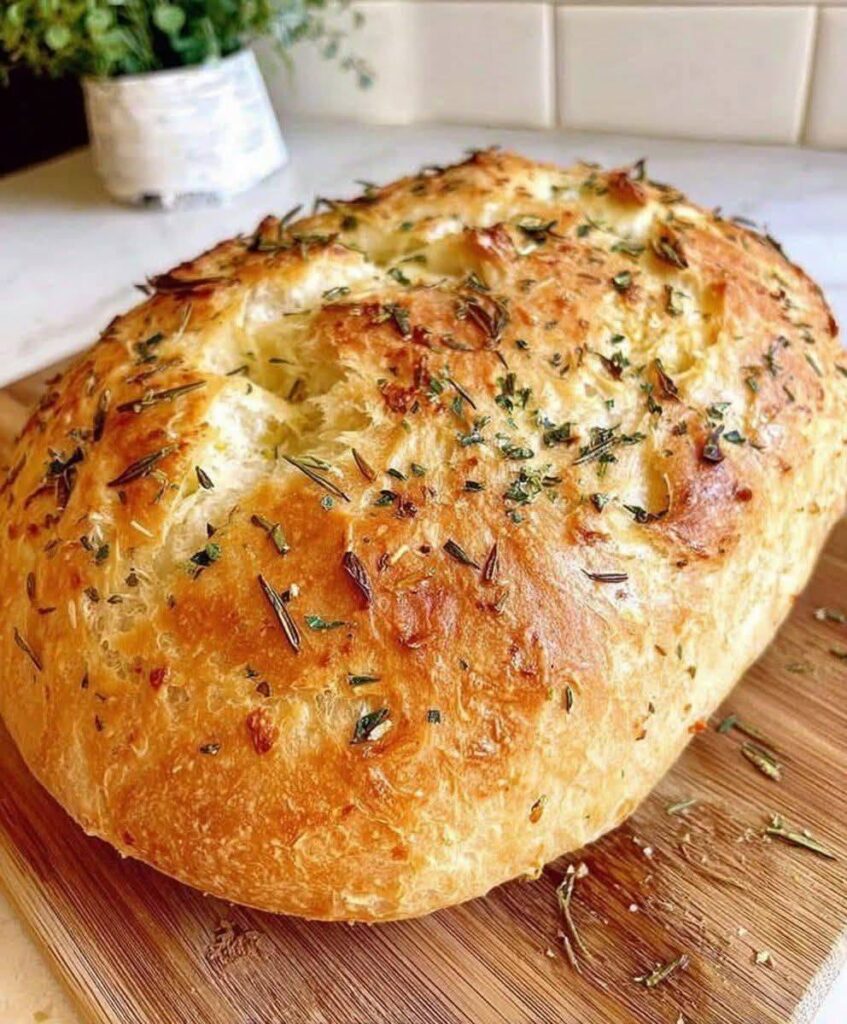
This rustic No-Knead Rosemary Garlic Artisan Bread has a crisp, golden crust and a soft, chewy interior filled with fragrant rosemary and roasted garlic flavor. There’s no kneading required—the long fermentation does the work for you.
Ingredients
- 3 cups (390 g) all-purpose or bread flour
- 1½ cups (360 ml) lukewarm water
- 1½ tsp salt
- ½ tsp instant yeast
- 2 tbsp fresh rosemary, finely chopped
- 4–5 cloves garlic, finely minced
- 1 tbsp olive oil
- 1 tsp honey or sugar, optional
- Extra flour, for shaping
Optional topping
- 1 tbsp olive oil
- 1 tbsp chopped fresh rosemary
- 1 small garlic clove, very finely minced
- Flaky sea salt
Instructions
1. Mix the dough
Add the flour, salt, and instant yeast to a large mixing bowl.
Stir in the chopped rosemary and minced garlic.
Add the lukewarm water and olive oil.
If using honey, stir it into the water before adding it.
Mix with a wooden spoon or sturdy spatula until no dry flour remains.
The dough should look very sticky and shaggy.
Don’t knead it.
2. Cover and let it rise
Cover the bowl tightly with plastic wrap, a lid, or a clean kitchen towel.
Leave it at room temperature for 12–18 hours.
A cooler room may require closer to 18 hours, while a warm kitchen may need less.
The dough is ready when it has approximately doubled in size and the surface is covered with bubbles.
Shape the Bread
3. Prepare your work surface
Generously flour a work surface.
Scrape the dough out of the bowl using a dough scraper or spatula.
The dough will be sticky—this is normal.
Sprinkle the top lightly with flour.
4. Shape gently
Fold the edges of the dough toward the center several times.
Turn the dough over so the smoother side is facing upward.
Gently shape it into a round loaf.
Don’t knead or press the air out.
5. Rest
Place the shaped dough on a sheet of parchment paper lightly dusted with flour.
Cover loosely with a clean towel.
Let it rest for 30–45 minutes while the oven heats.
Preheat the Dutch Oven
6. Heat the oven
Place a 5–6 quart Dutch oven with its lid inside the oven.
Preheat to 450°F (230°C).
Allow the Dutch oven to heat for at least 30 minutes.
The extremely hot pot is what helps create the beautiful artisan crust.
Bake the Bread
7. Transfer the dough
Carefully remove the hot Dutch oven.
Lift the dough using the parchment paper and place it directly into the Dutch oven.
Be extremely careful—the pot will be very hot.
8. Score the loaf
Use a sharp knife or bread lame to make a shallow slash across the top.
A simple cross or one long slash works well.
9. Cover and bake
Cover with the hot lid.
Bake at 450°F (230°C) for 30 minutes.
The trapped steam helps the bread expand and creates a crisp, blistered crust.
10. Finish uncovered
Remove the lid.
Reduce the temperature to 425°F (220°C).
Continue baking for 10–15 minutes, until the loaf is deeply golden brown.
For a darker crust, bake a few minutes longer.
11. Cool completely
Carefully remove the bread from the Dutch oven.
Place it on a wire rack.
Allow it to cool for at least 1 hour before slicing.
This is important—the interior continues setting as it cools.
Extra Garlic-Rosemary Topping
For an even more aromatic loaf, combine:
- 1 tbsp olive oil
- 1 tbsp chopped rosemary
- 1 finely minced garlic clove
- Pinch of flaky sea salt
Brush a very thin layer over the hot bread immediately after removing it from the oven.
Don’t add too much raw garlic, as it can burn on the crust.
Roasted Garlic Version
For sweeter, mellower garlic flavor, roast a whole head of garlic beforehand.
To roast the garlic
- Cut the top off a head of garlic.
- Drizzle with olive oil.
- Wrap loosely in foil.
- Bake at 400°F (200°C) for 35–45 minutes.
- Cool slightly.
- Squeeze the soft cloves from their skins.
Mash 6–8 roasted garlic cloves and fold them into the dough along with the rosemary.
This produces a much more subtle and buttery garlic flavor.
Parmesan Rosemary Bread
Add ½ cup (50 g) finely grated Parmesan to the dough.
For extra flavor, sprinkle another 1–2 tablespoons Parmesan over the top before baking.
Cheesy Garlic Bread Version
After the loaf has completely cooled, slice it without cutting all the way through.
Fill the cuts with:
- Softened butter
- Minced garlic
- Mozzarella
- Parmesan
- Fresh rosemary
Wrap loosely in foil and bake at 375°F (190°C) for 10–15 minutes until the cheese melts.
Tips for Perfect No-Knead Bread
Don’t add too much flour
The dough should be sticky.
Adding lots of flour during shaping can make the finished bread dense.
Give it enough time
The long rise develops flavor and creates the characteristic open crumb.
Use instant yeast
Instant yeast can be mixed directly into the flour without being activated separately.
Preheat the Dutch oven
A properly heated Dutch oven is essential for getting the dramatic rise and crisp crust.
Don’t slice too soon
Cutting into hot bread can cause the interior to become gummy.
Give it plenty of time to cool.
Storage
Store the cooled loaf at room temperature in a paper bag or loosely wrapped kitchen towel for up to 2 days.
Avoid storing artisan bread in the refrigerator, as refrigeration can make it stale faster.
For longer storage, slice the bread and freeze it in an airtight freezer bag for up to 3 months.
Reheat slices directly from frozen in a toaster or oven.
Best Serving
Serve thick slices warm with salted butter, whipped herb butter, or olive oil for dipping. The crisp crust, chewy interior, fragrant rosemary, and mellow garlic make this loaf especially good alongside soups, pasta, roasted meats, or a simple salad.