
Homemade No-Knead Bread
Prep time: 15 minutes
First rise: 12–18 hours
Second rise: 30–60 minutes
Bake time: 40–50 minutes
Total time: About 13–20 hours
Makes: 1 large round loaf
This homemade no-knead bread is wonderfully simple: mix the dough, let time develop the gluten and flavor, shape it, and bake it in a hot Dutch oven. The result is a rustic loaf with a deeply browned, crisp crust and a soft, chewy interior full of beautiful air pockets.
Ingredients
- 3 cups (390 g) bread flour
- 1½ cups (360 ml) warm water
- 1½ tsp salt
- ½ tsp instant yeast
- 1 tsp honey or sugar, optional
- 1 tbsp olive oil, optional, for a slightly softer crumb
- Extra flour, for shaping
Equipment
- Large mixing bowl
- Wooden spoon or sturdy spatula
- Plastic wrap or reusable bowl cover
- Dutch oven with a lid, preferably 4½–6 quarts
- Parchment paper
- Sharp knife or bread lame
- Wire cooling rack
Instructions
1. Mix the dough
Add the flour, instant yeast, and salt to a large mixing bowl.
If you’re using honey or sugar, add it now as well.
Pour in the warm water and stir with a wooden spoon or spatula.
Mix until there are no obvious dry patches of flour remaining. The dough will look shaggy, sticky, and somewhat messy.
Don’t worry about making it smooth.
If using olive oil, drizzle it over the dough and gently fold it in.
2. Cover and let it rise
Cover the bowl tightly with plastic wrap or a lid.
Leave it at room temperature for 12–18 hours.
The ideal location is somewhere comfortably warm but not hot.
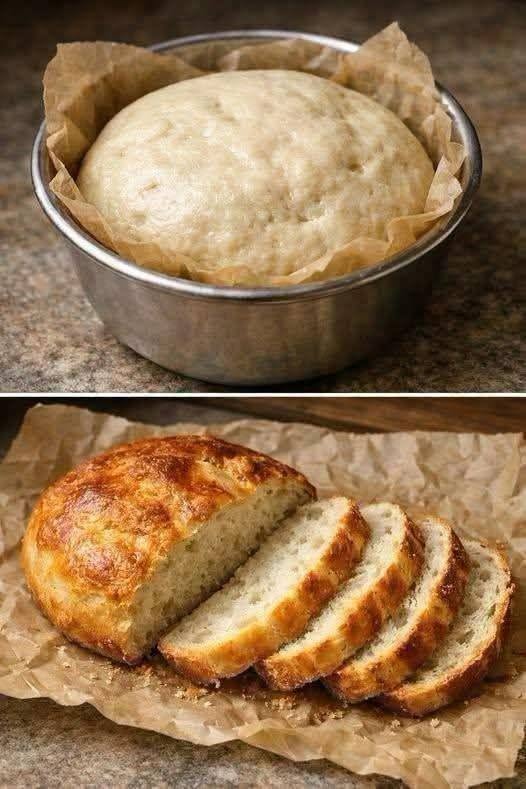
During this long fermentation, the yeast slowly develops the dough’s structure and flavor. By the next day, the dough should look noticeably expanded and bubbly.
A properly fermented dough will generally have:
- A larger volume
- Bubbles across the surface
- A slightly domed or uneven appearance
- A pleasant fermented, wheaty aroma
If your kitchen is particularly warm, the dough may be ready closer to 10–12 hours. If your kitchen is cool, it may need closer to 18 hours.
3. Prepare your work surface
Generously flour your countertop.
The dough will be sticky, so don’t be afraid to use enough flour to prevent it from sticking.
Scrape the dough out of the bowl onto the floured surface.
Try not to aggressively punch it down. You want to preserve some of the air developed during fermentation.
4. Shape the loaf
Lightly flour your hands.
Gently pull the edges of the dough toward the center, working around the loaf until you have a roughly round shape.
Flip it over so the seams are underneath.
Using your cupped hands, gently drag the dough toward yourself across the counter.
Rotate it and repeat several times.
This creates surface tension and helps the loaf maintain a nice round shape.
Don’t knead the dough. The whole point of this recipe is that the long fermentation does most of the gluten development for you.
5. Rest the dough
Place a sheet of parchment paper on your counter and lightly flour it.
Transfer the shaped dough onto the parchment.
Cover it loosely with a clean kitchen towel.
Let it rest for approximately 30–60 minutes.
During this time, preheat the oven.
6. Preheat the Dutch oven
Place your Dutch oven, including the lid, inside the oven.
Preheat the oven to 450°F (230°C).
Allow the Dutch oven to heat for at least 30 minutes.
This step is extremely important.
A properly preheated Dutch oven gives the dough an immediate blast of heat when it goes inside. The covered environment traps steam released from the dough, which helps produce that characteristic crisp, blistered crust.
7. Score the bread
When you’re ready to bake, carefully remove the extremely hot Dutch oven.
Keep your hands protected with oven mitts.
Using a sharp knife or bread lame, make one deep slash across the top of the dough.
A single long slash is simple and attractive, but you can also create a cross or decorative pattern.
The cut gives the bread a controlled place to expand as it bakes.
8. Bake covered
Carefully lower the dough into the hot Dutch oven using the parchment as a sling.
Place the lid on immediately.
Transfer the Dutch oven to the oven.
Bake covered for 25–30 minutes.
During this stage, the trapped steam keeps the crust flexible while the loaf expands.
9. Bake uncovered
Remove the Dutch oven lid.
Continue baking for another 15–20 minutes, or until the bread is a deep golden brown.
For a particularly dark, rustic crust, you can let it bake a few minutes longer.
Keep an eye on it toward the end because the crust can darken quickly.
10. Check for doneness
The loaf should feel relatively light for its size and have a deeply browned crust.
If you have an instant-read thermometer, the center should generally reach approximately 200–210°F (93–99°C).
Another traditional test is to carefully tap the bottom of the loaf. It should sound hollow.
11. Cool completely
Remove the bread from the Dutch oven and place it on a wire rack.
Let it cool for at least 1 hour before slicing.
This is difficult because the bread will smell incredible, but cutting too soon can cause the interior to become gummy.
As the loaf cools, the crumb continues to set and the texture improves.
Once cool, slice it with a serrated bread knife.
What the Finished Bread Should Be Like
The ideal loaf should have:
- A crisp, deeply browned crust
- A soft but chewy interior
- Irregular holes throughout the crumb
- A lightly fermented, wheaty flavor
- A slightly moist but never gummy center
The longer fermentation gives this bread considerably more flavor than a quick yeast loaf.
Important Tips
Don’t add too much flour
Because the dough is sticky, it’s tempting to keep adding flour.
Try not to.
Too much flour can turn the finished loaf dense and heavy. Use flour mainly on your hands and work surface rather than incorporating large amounts into the dough.
Use the right water temperature
The water should feel warm, not hot.
Very hot water can damage or kill the yeast.
If you don’t have a thermometer, lukewarm water is a good target.
Give the dough enough time
The long rise is the heart of no-knead bread.
Don’t rush it just because the dough has already increased in size. You want plenty of fermentation and visible bubbles before shaping.
Preheat the Dutch oven
Don’t put the dough into a cold Dutch oven unless the recipe specifically calls for it.
The combination of a hot pot and trapped steam is what helps create the bakery-style crust.
Don’t skip the cooling period
A beautiful loaf can still be disappointing if it’s sliced while piping hot.
Give it time to cool so the crumb can finish setting.
Overnight Schedule
For an easy morning-to-afternoon baking schedule:
8:00 PM: Mix the dough.
8:15 PM: Cover and leave at room temperature.
8:00 AM: Shape the dough.
8:15 AM: Start preheating the oven and Dutch oven.
8:45 AM: Score and bake.
9:30 AM: Remove from oven.
10:30 AM: Slice and serve.
Serving Ideas
Freshly baked no-knead bread is fantastic simply sliced and spread with butter, but it also works beautifully with:
- Scrambled eggs
- Soups and stews
- Creamy pasta
- Roasted chicken
- Cheese and charcuterie
- Avocado and poached eggs
- Tomato and mozzarella
- Garlic butter
- Jam and honey
For an especially simple breakfast, toast thick slices until golden and top them with butter, flaky salt, and a drizzle of honey.
Storing the Bread
Once completely cool, store the loaf at room temperature in a paper bag, bread bag, or loosely wrapped kitchen towel.
Avoid refrigerating it because refrigeration can make bread stale faster.
For longer storage, slice the loaf and freeze the slices in an airtight freezer bag for up to about 3 months.
You can toast slices directly from frozen.
Best result: bake the loaf in the morning and enjoy it while the crust is still wonderfully crisp and the inside is fresh, chewy, and fragrant.