
Rustic No-Knead Rosemary & Garlic Artisan Bread
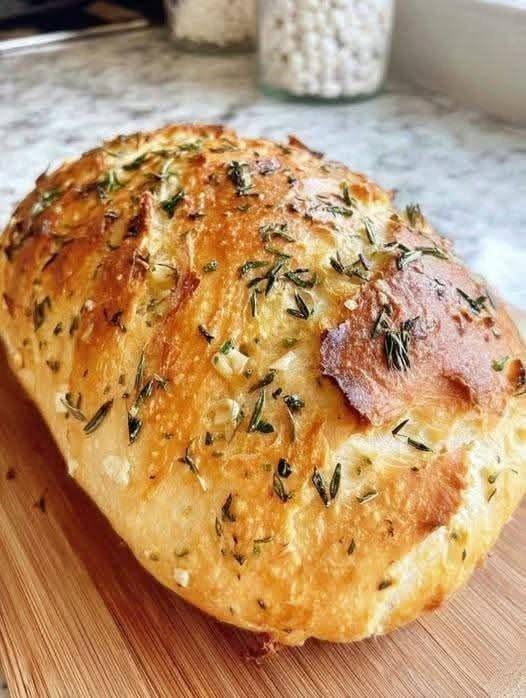
This Rustic No-Knead Rosemary & Garlic Artisan Bread has a crisp, golden crust, a soft and chewy interior, and loads of fragrant rosemary and roasted garlic flavor. Best of all, there’s no kneading required—a long resting time develops the dough and gives it that beautiful artisan texture.
It’s wonderful served warm with butter, alongside soup, or used for sandwiches and dipping in olive oil.
Ingredients
- 3 cups (390 g) all-purpose or bread flour
- 1½ cups (360 ml) lukewarm water
- 1½ teaspoons salt
- ½ teaspoon instant yeast
- 1 tablespoon olive oil
- 2–3 cloves garlic, finely minced
- 1½ tablespoons fresh rosemary, finely chopped
- 1 teaspoon honey or sugar, optional
- Extra flour, for shaping
- Extra rosemary, for topping
- Flaky sea salt, optional
Instructions
- Combine the dry ingredients.
In a large mixing bowl, whisk together the flour, salt, and instant yeast. - Add the flavorings.
Stir in the minced garlic and chopped rosemary. Make sure they’re evenly distributed throughout the flour. - Add the water and olive oil.
Pour in the lukewarm water and olive oil. Add the honey or sugar if using.Stir everything together with a wooden spoon or rubber spatula until there are no large patches of dry flour. The dough will look rough, sticky, and shaggy. That’s exactly what you want.
- Cover and rest.
Cover the bowl tightly with plastic wrap or a clean kitchen towel.Let the dough rest at room temperature for 12–18 hours.
The dough should become noticeably puffy, bubbly, and airy. A longer fermentation gives the bread more developed flavor.
Shape the Dough
- Prepare your work surface.
Generously flour your work surface. The dough will be sticky, so flour your hands lightly as well. - Turn out the dough.
Gently scrape the dough onto the floured surface. Try not to deflate it too much. - Shape the loaf.
Fold the edges of the dough toward the center several times, then gently turn it over so the seam is underneath.Shape it into a rough round loaf. Don’t worry about making it perfectly smooth—its rustic appearance is part of the charm.
- Rest again.
Place the dough on a piece of parchment paper dusted lightly with flour. Cover loosely and let it rest for 30–45 minutes while you heat the oven.
Bake the Artisan Bread
- Preheat the Dutch oven.
Place a 5–6 quart Dutch oven with its lid inside your oven.Preheat the oven to 450°F (230°C) for at least 30 minutes. The Dutch oven needs to become thoroughly hot.
- Score the bread.
Carefully transfer the dough, still on the parchment, near the hot Dutch oven.Use a sharp knife or bread lame to make one or two shallow cuts across the top. Sprinkle with a little extra rosemary and flaky sea salt if desired.
- Bake covered.
Carefully lower the dough into the hot Dutch oven. Cover with the lid.Bake for 30 minutes with the lid on. The trapped steam helps create that classic crisp artisan crust.
- Bake uncovered.
Remove the lid and continue baking for 10–15 minutes, until the bread is deeply golden brown and crisp. - Cool completely.
Carefully remove the loaf from the Dutch oven and place it on a wire rack.Allow it to cool for at least 1 hour before slicing. Cutting too early can cause the interior to become gummy.
Tips for Perfect No-Knead Bread
- Don’t add extra flour to the dough. It should be sticky. Too much flour can make the finished bread dense.
- Use fresh rosemary for the strongest flavor.
- Make sure your yeast is fresh and active.
- The long fermentation is what gives this bread its artisan-style flavor and texture.
- A preheated Dutch oven creates the steam necessary for a crisp crust.
- Don’t skip the cooling period—the crumb continues setting as the bread cools.
- For an even more rustic crust, dust the shaped dough lightly with flour before scoring.
Roasted Garlic Variation
For a sweeter, deeper garlic flavor, use roasted garlic instead of raw garlic.
Wrap a whole head of garlic in foil with a drizzle of olive oil and roast at 400°F (200°C) for about 35–45 minutes, until soft and golden.
Let it cool, squeeze the cloves from their skins, mash them, and gently fold the roasted garlic into the dough before the overnight rise.
Flavor Variations
Parmesan Rosemary:
Add ½ cup finely grated Parmesan to the dough.
Cheddar Garlic:
Add 1 cup shredded sharp cheddar during the first mixing stage.
Olive & Rosemary:
Add ½ cup chopped Kalamata or green olives for a Mediterranean-style loaf.
Lemon Rosemary:
Add 1 teaspoon finely grated lemon zest along with the rosemary.
Spicy Garlic:
Add ½ teaspoon red pepper flakes for a subtle kick.
Serving Ideas
This bread is delicious served warm with:
- Salted butter
- Garlic butter
- Extra-virgin olive oil
- Balsamic vinegar
- Tomato soup
- Creamy mushroom soup
- Pasta
- Roasted chicken
- Cheese and charcuterie
For a simple appetizer, slice the bread, toast it lightly, and serve with olive oil, flaky salt, and a little balsamic vinegar for dipping.
Storage
Once completely cooled, store the bread in a paper bag or loosely wrapped kitchen towel at room temperature for up to 2–3 days.
Avoid storing artisan bread in the refrigerator, as this can make the crumb stale more quickly.
For longer storage, slice the cooled loaf and freeze it in an airtight freezer bag for up to 3 months.
Makes
1 rustic artisan loaf
For the best experience, slice it while slightly warm and spread with salted butter. The combination of crackly crust, chewy crumb, fragrant rosemary, and savory garlic makes this simple no-knead loaf taste like it came straight from a bakery.