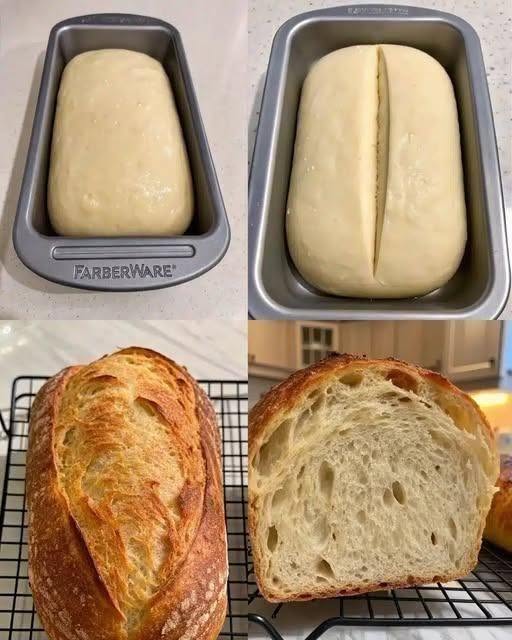

Gluten-Free Sandwich Bread
A soft, tender gluten-free sandwich loaf with a golden crust and slices that are perfect for toast, sandwiches, and breakfast. This recipe is designed to be easy and dependable without needing to knead the dough.
🍞 Recipe at a Glance
- Yield: 1 loaf
- Servings: 10–12 slices
- Prep time: 15 minutes
- Rise time: 45–60 minutes
- Bake time: 40–50 minutes
- Total time: About 1½ hours
- Pan: 9 × 5-inch loaf pan
- Oven: 375°F (190°C)
🛒 Ingredients
🌾 Dry Ingredients
- 2¾ cups (385 g) gluten-free all-purpose flour blend
- 2 teaspoons xanthan gum, only if your flour blend doesn’t already contain it
- 2¼ teaspoons (1 packet) instant or active dry yeast
- 2 tablespoons granulated sugar
- 1 teaspoon salt
- ½ teaspoon baking powder
🥛 Wet Ingredients
- 1¼ cups (300 ml) warm milk, dairy or unsweetened plant milk
- 2 large eggs, room temperature
- 3 tablespoons olive oil or melted butter
- 1 tablespoon honey
- 1 teaspoon apple cider vinegar
🔥 Step 1: Prepare the Pan
Grease a 9 × 5-inch loaf pan.
For easier removal, line it with parchment paper, leaving some paper hanging over the sides.
Set aside.
🥣 Step 2: Activate the Yeast
If using active dry yeast, combine:
- Warm milk
- Honey
- Sugar
- Yeast
The milk should feel warm but not hot.
Let stand for approximately 5–10 minutes, until slightly foamy.
If using instant yeast, you can simply add it directly to the dry ingredients.
🌾 Step 3: Mix the Dry Ingredients
In a large bowl, whisk together:
- Gluten-free flour
- Xanthan gum, if needed
- Salt
- Baking powder
- Yeast, if using instant yeast
Mix thoroughly.
🥚 Step 4: Add the Wet Ingredients
Add:
- Eggs
- Olive oil or melted butter
- Apple cider vinegar
- Honey
- Yeast mixture, if you activated the yeast separately
🥄 Step 5: Beat the Dough
Beat with a sturdy spoon, hand mixer, or stand mixer with a paddle attachment for approximately 3–4 minutes.
Important:
Gluten-free bread dough will not look like traditional wheat bread dough.
It should resemble a very thick, sticky batter.
Don’t add lots of extra flour—the moisture is necessary for a soft loaf.
🍞 Step 6: Transfer to the Pan
Scoop the dough into the prepared loaf pan.
Use a wet spatula or damp hands to smooth the top.
Shape it so the surface is relatively even.
⏰ Step 7: Let It Rise
Cover the pan loosely with plastic wrap or a clean kitchen towel.
Place it somewhere warm and draft-free.
Allow it to rise for approximately:
45–60 minutes
The dough should rise noticeably and come close to the top of the loaf pan.
Don’t wait for it to double.
Gluten-free dough can become over-proofed more easily than traditional bread dough.
🔥 Step 8: Preheat the Oven
While the bread is rising, preheat your oven to:
375°F (190°C)
🍞 Step 9: Bake
Place the risen loaf in the oven.
Bake for approximately:
40–50 minutes
The top should be golden brown and firm.
If the top starts browning too quickly, loosely cover it with foil during the final 10–15 minutes.
🌡️ Step 10: Check for Doneness
For the most reliable result, use an instant-read thermometer.
The center of the bread should reach approximately:
200–205°F (93–96°C)
This is especially useful with gluten-free bread because the crust can look done while the center is still moist.
❄️ Step 11: Cool Completely
Remove the bread from the pan.
Place it on a wire rack.
Let it cool for at least:
1 hour
before slicing.
Don’t skip this!
Gluten-free bread needs time to finish setting internally. Cutting it while hot can produce a gummy center.
🔪 Step 12: Slice
Use a serrated bread knife.
Slice gently rather than pressing straight down.
For sandwiches, slices approximately ½ inch thick work well.
🥪 How to Use It
This bread is excellent for:
- Turkey and cheese sandwiches
- Grilled cheese
- Egg sandwiches
- Peanut butter and jelly
- Avocado toast
- Tuna salad sandwiches
- French toast
- Toast with butter and jam
🧄 Garlic Herb Gluten-Free Bread
Add to the dry ingredients:
- 1 teaspoon garlic powder
- 1 teaspoon dried parsley
- ½ teaspoon dried oregano
Brush the baked loaf with garlic butter while warm.
🧀 Cheesy Sandwich Bread
Fold into the batter:
¾ cup shredded cheddar or mozzarella
Sprinkle another ¼ cup cheese over the top before baking.
🌻 Seeded Gluten-Free Bread
Add:
- 2 tablespoons sunflower seeds
- 1 tablespoon sesame seeds
- 1 tablespoon pumpkin seeds
Sprinkle additional seeds over the top before baking.
🍯 Slightly Sweet Breakfast Bread
Increase the honey to:
2 tablespoons
Add:
1 teaspoon cinnamon
and ½ cup raisins.
This makes excellent toast with butter.
👩🍳 Tips for Soft Gluten-Free Bread
Use a good flour blend
A commercial gluten-free all-purpose blend containing rice flour, starches, and a binder generally works best.
Check the xanthan gum
If your flour blend already contains xanthan gum, don’t add the extra amount listed in the recipe.
Don’t add too much flour
The dough should be sticky and soft.
Use room-temperature eggs
They incorporate more easily and help the yeast work efficiently.
Don’t over-proof
Once the loaf has risen substantially, get it into the oven.
Cool completely
This is essential for a good crumb and clean slices.
⚠️ Strict Gluten-Free Preparation
If this bread is being made for someone with celiac disease or a strict gluten-free requirement, make sure every ingredient is certified gluten-free where appropriate.
Also prevent cross-contact by using clean:
- Mixing bowls
- Measuring cups
- Utensils
- Cutting boards
- Toaster
A shared toaster can contain wheat crumbs.
🧊 Storage
Once completely cool, store the bread tightly wrapped at room temperature for approximately 2 days.
For longer storage, refrigeration or freezing is preferable.
❄️ Freezing
Slice the loaf before freezing.
Place parchment between slices and store in a freezer-safe bag.
Freeze for up to 3 months.
Slices can go directly from the freezer into the toaster.
⭐ Final Result
You’ll have a soft, tender gluten-free sandwich loaf with a lightly crisp golden crust and a moist, sliceable center.
It’s especially good toasted, but sturdy enough for everyday sandwiches—without the dense, crumbly texture that can make gluten-free bread disappointing.