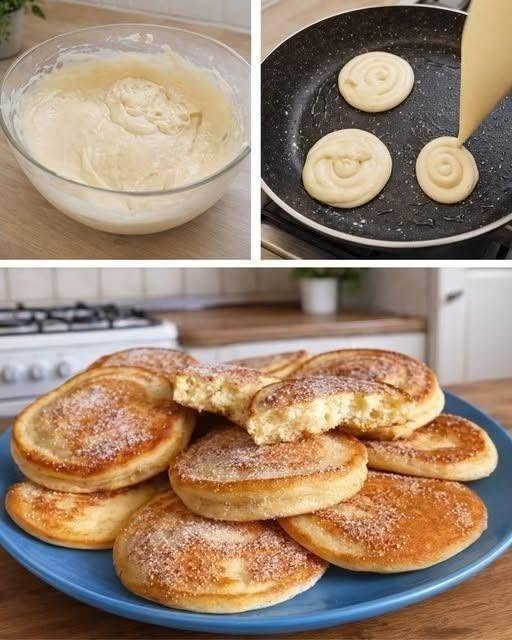

🥞 Fluffy Gluten-Free Pancakes
These pancakes are soft, fluffy, lightly sweet, and golden brown. They make a great breakfast and can be served with fruit, honey, maple syrup, yogurt, or chocolate.
Servings: 3–4 people
Makes: About 8–10 pancakes
Preparation: 15 minutes
Resting: 10 minutes
Cooking: 15–20 minutes
Ingredients
Dry ingredients
- 1 cup (125 g) gluten-free all-purpose flour
- 1½ tablespoons sugar
- 1½ teaspoons baking powder
- ¼ teaspoon baking soda
- ¼ teaspoon salt
Wet ingredients
- 1 large egg
- ¾ cup (180 ml) milk
- 2 tablespoons melted butter
- 1 teaspoon vanilla extract
For cooking
- 1–2 tablespoons butter or neutral cooking oil
Optional toppings
- Fresh strawberries
- Blueberries
- Banana slices
- Honey
- Maple syrup
- Peanut butter
- Almond butter
- Greek yogurt
- Chocolate chips
- Cinnamon
- Powdered sugar
Step 1: Prepare the ingredients
Before you begin, measure all of your ingredients carefully.
If possible, use room-temperature milk and egg. Room-temperature ingredients generally combine more easily and help produce a smoother batter.
Melt the butter and allow it to cool slightly. It should be melted but not extremely hot.
If you’re preparing these pancakes for someone who must strictly avoid gluten, make sure the flour, baking powder, and other ingredients are labeled gluten-free, and avoid cross-contamination from utensils and cooking surfaces.
Step 2: Mix the dry ingredients
Take a large mixing bowl.
Add:
- 1 cup gluten-free flour
- 1½ tablespoons sugar
- 1½ teaspoons baking powder
- ¼ teaspoon baking soda
- ¼ teaspoon salt
Use a whisk to mix everything together thoroughly for about 30 seconds.
This step is important because the baking powder and baking soda need to be evenly distributed throughout the flour. If they’re not mixed properly, some pancakes may rise more than others.
Step 3: Prepare the wet mixture
Take another bowl.
Crack one large egg into it and whisk it gently.
Add the milk, melted butter, and vanilla extract.
Whisk everything together until the egg is completely mixed into the milk.
The mixture should look smooth and creamy.
Step 4: Combine the mixtures
Make a small hole or well in the center of your dry ingredients.
Slowly pour the wet mixture into the dry ingredients.
Using a whisk or spatula, gently combine the ingredients.
Do not vigorously beat the batter.
You only need to mix until you no longer see large areas of dry flour. A few small lumps are completely fine.
Overmixing can result in pancakes that are heavy rather than light and fluffy.
Step 5: Check the batter consistency
The finished batter should be thick but pourable.
When you lift your spoon or whisk, the batter should fall back into the bowl in a thick stream.
If your batter is too thick, add 1 tablespoon of milk and mix gently.
If it’s still too thick, add another tablespoon.
If the batter is too thin, add 1 tablespoon of gluten-free flour and gently mix.
Don’t worry if the batter looks slightly different from normal wheat-flour pancake batter. Different gluten-free flour blends absorb liquid differently.
Step 6: Let the batter rest
This is an important step for gluten-free pancakes.
Allow the batter to rest for approximately 10 minutes.
During this time, the gluten-free flour absorbs some of the liquid. This helps improve the texture and prevents the pancakes from being too crumbly.
After resting, look at the batter again.
If it has become very thick, add 1–2 teaspoons of milk and gently stir.
Step 7: Preheat your pan
Place a nonstick frying pan or flat griddle over medium-low to medium heat.
Let the pan heat for about 2–3 minutes.
Add a small amount of butter or oil and spread it across the cooking surface.
You don’t need a lot of butter. Too much can cause the pancakes to become greasy and brown unevenly.
How to know if the pan is ready
Drop a tiny amount of water onto the pan.
If the water gently sizzles and evaporates, the pan is probably ready.
If it immediately burns away with aggressive sizzling, the pan may be too hot. Reduce the heat and wait a little.
Step 8: Cook the pancakes
Scoop approximately ¼ cup of batter for each pancake.
Pour it into the center of the pan.
Allow the batter to spread naturally.
Don’t make the pancakes extremely thin. Slightly thicker pancakes will give you a softer and fluffier texture.
Depending on the size of your pan, you can cook 2–3 pancakes at a time.
Step 9: Wait for the bubbles
Let the pancake cook without disturbing it.
After about 2–3 minutes, you should start seeing small bubbles appearing on the surface.
The edges will also begin to look firm and slightly dry.
This is the time to check the bottom.
Carefully slide a spatula underneath the pancake.
If the bottom is golden brown, it’s ready to flip.
If it’s still pale, give it another 30–60 seconds.
Step 10: Flip the pancake
Carefully slide a wide spatula underneath the pancake.
Lift it and flip it in one smooth movement.
Try not to press down on the pancake after flipping.
Pressing the pancake with the spatula can remove some of the air that makes it fluffy.
Cook the second side for approximately 1–2 minutes.
The second side will usually cook faster than the first.
When both sides are golden brown and the center feels cooked, remove the pancake from the pan.
Step 11: Continue cooking
Repeat the process with the remaining batter.
Before adding another batch, check the heat.
If the pancakes are becoming dark brown very quickly, turn the heat down.
If they’re taking a very long time to cook and remain pale, increase the heat slightly.
The goal is a golden-brown outside with a soft, cooked center.
Step 12: Keep pancakes warm
If you’re making a large batch, place the cooked pancakes on a plate and cover them loosely with foil.
You can also place them in a warm oven at approximately 90°C (200°F) while you finish cooking.
Don’t leave them uncovered for too long, because they can dry out.
🍓 Serving the Pancakes
Once all the pancakes are cooked, stack them on a plate.
Add your favorite toppings.
Classic version
Add a little butter on top and drizzle with maple syrup or honey.
Fruit version
Add sliced bananas, strawberries, and blueberries. Finish with honey or maple syrup.
Chocolate version
Add chocolate chips to the batter before cooking, or sprinkle them over the finished pancakes.
Creamy version
Serve with Greek yogurt, fresh berries, and a little honey.
Peanut butter version
Spread peanut butter between the pancake layers and top with banana slices and honey.
⭐ Important Tips for Perfect Gluten-Free Pancakes
Don’t overmix
This is one of the most important rules. Mix the batter just until the ingredients are combined.
Don’t make the pan too hot
High heat can burn the outside while leaving the inside undercooked.
Medium-low to medium heat is usually best.
Let the batter rest
Give gluten-free batter about 10 minutes to hydrate. This can make a noticeable difference in texture.
Don’t press the pancakes
Once you flip them, leave them alone. Pressing them down can make them flatter and less fluffy.
Adjust the milk if necessary
Gluten-free flour blends vary significantly. Some absorb much more liquid than others.
Your batter should be thick and pourable, not watery and not so thick that it stays in a lump.
🥞 How to Tell When They’re Perfect
A properly cooked gluten-free pancake should have:
- A golden-brown surface
- Slightly crisp edges
- A soft, fluffy center
- No wet batter in the middle
- Enough structure to pick it up without falling apart
Cut one pancake open after your first batch. If the center is wet, reduce the heat slightly and cook the next pancakes for a little longer.
If they’re dry and dense, your heat may be too low for too long, or the batter may contain too much flour.
❄️ Storing Leftover Pancakes
If you have leftovers, allow them to cool completely.
Place them in an airtight container and refrigerate for up to 3 days.
For longer storage, place parchment paper between the pancakes and freeze them in a freezer-safe container or bag.
To reheat, use a microwave, toaster, or frying pan until warm.
For the fluffiest result, freshly cooked pancakes are best.