
No-Bake Peanut Butter Chocolate Crunch Bars
Prep time: 15 minutes
Chill time: 2 hours
Total time: About 2 hours 15 minutes
Makes: 12–16 bars
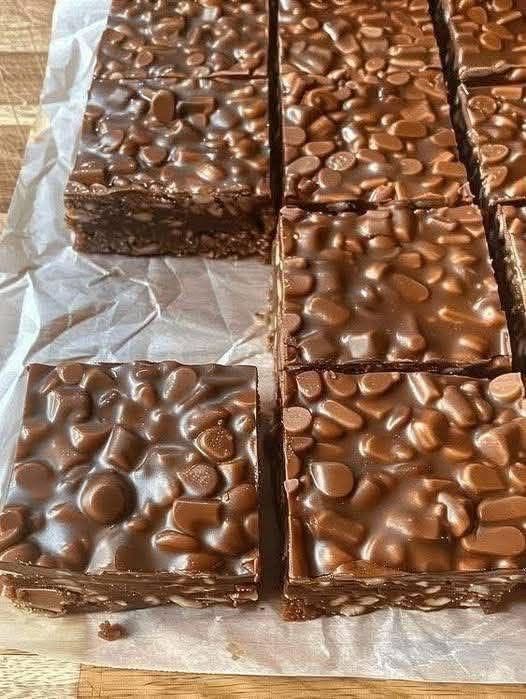
These no-bake peanut butter chocolate crunch bars combine creamy peanut butter, crispy cereal, chewy oats, and rich chocolate into an easy dessert with plenty of texture. They’re perfect when you want something sweet without turning on the oven.
Ingredients
Peanut Butter Crunch Layer
- 1½ cups (150 g) rolled oats
- 1½ cups (45 g) crispy rice cereal
- ¾ cup (190 g) creamy peanut butter
- ⅓ cup (110 g) honey or maple syrup
- 2 tbsp unsalted butter or coconut oil
- 1 tsp vanilla extract
- ¼ tsp salt
Chocolate Topping
- 1½ cups (255 g) semi-sweet or dark chocolate chips
- 2 tbsp creamy peanut butter
- 1 tsp coconut oil, optional
Optional additions
- ½ cup chopped roasted peanuts
- 2 tbsp mini chocolate chips
- 2 tbsp shredded coconut
- 1 tbsp chia seeds
- Flaky sea salt for finishing
Instructions
1. Prepare the pan
Line an 8×8-inch (20×20 cm) square baking pan with parchment paper.
Leave some parchment hanging over two sides so the chilled bars can be lifted out easily.
2. Mix the dry ingredients
Add the rolled oats and crispy rice cereal to a large bowl.
If using chopped peanuts, coconut, or chia seeds, add them now.
Stir gently to combine without crushing the cereal.
3. Make the peanut butter mixture
Add the peanut butter, honey or maple syrup, and butter or coconut oil to a small saucepan.
Warm over low heat, stirring constantly, until the mixture becomes smooth and glossy.
Don’t allow it to boil.
Remove from the heat and stir in the vanilla and salt.
4. Combine
Pour the warm peanut butter mixture over the oat and cereal mixture.
Stir gently but thoroughly until everything is evenly coated.
Work fairly quickly while the mixture is still warm.
5. Press into the pan
Transfer the mixture to the prepared pan.
Press it down firmly and evenly using the back of a spoon, spatula, or the bottom of a measuring cup.
Compact it well, especially around the corners.
This helps prevent the bars from crumbling.
6. Chill the base
Refrigerate for approximately 30–45 minutes, until firm.
Make the Chocolate Topping
7. Melt the chocolate
Place the chocolate chips and peanut butter in a microwave-safe bowl.
Microwave in 20–30 second intervals, stirring thoroughly after each interval.
Continue until smooth.
Add the coconut oil if the chocolate needs to be loosened.
You can also melt the chocolate gently over a double boiler.
8. Add the chocolate
Pour the melted chocolate over the chilled peanut butter base.
Spread it into an even layer with a spatula.
9. Add finishing touches
Sprinkle with chopped peanuts or a small pinch of flaky sea salt while the chocolate is still melted.
For a decorative finish, drizzle a little melted peanut butter over the chocolate and swirl it with a toothpick.
10. Chill completely
Refrigerate for 1–2 hours, until the chocolate is completely set.
For firmer bars, chill them overnight.
Cut the Bars
11. Lift and slice
Use the parchment overhang to lift the entire slab from the pan.
Place it on a cutting board.
Let it sit at room temperature for approximately 5 minutes if it’s very firm.
Use a sharp knife to cut into 12 large bars or 16 smaller squares.
For clean cuts, wipe the knife between slices.
Extra-Crunchy Version
For maximum crunch, replace ½ cup of the rolled oats with additional crispy rice cereal.
You can also stir in:
- ½ cup roasted peanuts
- ¼ cup chopped pretzels
- ¼ cup toasted coconut
The combination of salty and sweet flavors works especially well with the chocolate.
Dark Chocolate Peanut Butter Bars
Use 70–85% dark chocolate for the topping and maple syrup instead of honey.
Add a generous pinch of flaky sea salt.
The darker chocolate balances the sweetness of the peanut butter layer beautifully.
Chocolate Peanut Butter Protein Bars
For a higher-protein version, add 2–3 tbsp peanut butter or vanilla protein powder to the dry ingredients.
Because protein powder absorbs moisture, you may need an extra tablespoon of peanut butter or honey to keep the mixture cohesive.
Nut-Free Version
Replace the peanut butter with sunflower seed butter or another nut-free seed butter.
Use a certified nut-free crispy cereal and chocolate if allergies are a concern.
Tips for Perfect Bars
Press firmly
This is the most important step for bars that hold together.
Use the bottom of a flat measuring cup to compact the mixture.
Don’t overheat the peanut butter
Keep the saucepan over low heat.
You only need to warm the ingredients enough to make them smooth.
Chill between layers
Letting the base firm up before adding the chocolate creates clean, distinct layers.
Let them soften slightly before eating
Straight from the refrigerator, the chocolate can be quite firm.
Let a bar sit at room temperature for 5–10 minutes for the best texture.
Storage
Store the bars in an airtight container in the refrigerator for up to 1 week.
You can also freeze them for up to 2–3 months.
Place parchment between layers so they don’t stick together.
Thaw in the refrigerator or at room temperature.
Serving Idea
For the ultimate treat, top each bar with a little flaky sea salt and chopped roasted peanuts. The creamy peanut butter base, crisp cereal, chewy oats, and snappy chocolate topping give you a delicious combination of salty, sweet, creamy, and crunchy in every bite.