
🍒 No-Bake Cherry Cheesecake in a Jar
These adorable no-bake cherry cheesecakes in a jar have a buttery cookie crust, a rich and creamy cheesecake filling, and a sweet-tart cherry topping. They’re easy to make ahead and perfect for parties, picnics, holidays, or when you want an elegant dessert without turning on the oven.Yield: 6 jars
Jar size: 8 oz (240 ml) each
Prep time: 25 minutes
Chilling time: 3–4 hours
Total time: About 4 hours
Ingredients
For the crust
- 1½ cups (150 g) graham cracker crumbs
- 3 tbsp granulated sugar
- 5 tbsp (70 g) unsalted butter, melted
- Pinch of salt
For the cheesecake filling
- 16 oz (450 g) full-fat cream cheese, softened
- ½ cup (100 g) powdered sugar
- 1 tsp vanilla extract
- 1 tbsp fresh lemon juice
- 1 tsp lemon zest (optional)
- 1 cup (240 ml) heavy whipping cream, cold
For the cherry topping
- 2 cups (300 g) pitted cherries, fresh or frozen
- ⅓ cup (65 g) granulated sugar
- 1 tbsp fresh lemon juice
- 1 tsp cornstarch
- 1 tbsp cold water
- ½ tsp vanilla extract
For decoration
- Whipped cream
- Fresh cherries
- Graham cracker crumbs
- A little lemon zest
Instructions
1. Make the cherry topping first
Add the cherries, sugar, and lemon juice to a small saucepan.
Cook over medium heat for 5–7 minutes, stirring occasionally.
The cherries will release their juices and begin to soften.
If using frozen cherries, there’s no need to thaw them first.
2. Thicken the cherry sauce
In a small bowl, mix the cornstarch with the cold water until completely smooth.
Pour this mixture into the saucepan while stirring.
Cook for another 1–2 minutes, until the cherry mixture thickens.
Remove from the heat and stir in the vanilla.
Transfer the cherry topping to a bowl and let it cool completely.
Don’t add hot cherries to the cheesecake jars, because the heat can soften the filling.
3. Make the graham cracker crust
Place the graham cracker crumbs, sugar, and salt in a bowl.
Pour in the melted butter.
Mix until the crumbs resemble wet sand and hold together when pressed.
4. Fill the jars
Spoon approximately 2–3 tablespoons of the crust mixture into the bottom of each jar.
Press it down gently using the back of a spoon or the bottom of a small glass.
Don’t compact it too aggressively—you want a tender, crumbly crust.
Set the jars aside.
5. Make the cheesecake filling
Place the softened cream cheese in a large bowl.
Beat with an electric mixer for about 2 minutes, until completely smooth and creamy.
Add the powdered sugar, vanilla, lemon juice, and lemon zest.
Beat again until well combined.
Scrape down the sides of the bowl as needed.
6. Whip the cream
In a separate chilled bowl, beat the cold heavy cream until medium-stiff peaks form.
Don’t overbeat it or the cream can become grainy.
7. Combine the filling
Add about one-third of the whipped cream to the cream cheese mixture.
Gently fold it in.
Add the remaining whipped cream in two additions, folding gently after each addition.
The finished filling should be light, fluffy, and thick enough to hold its shape.
8. Assemble the cheesecakes
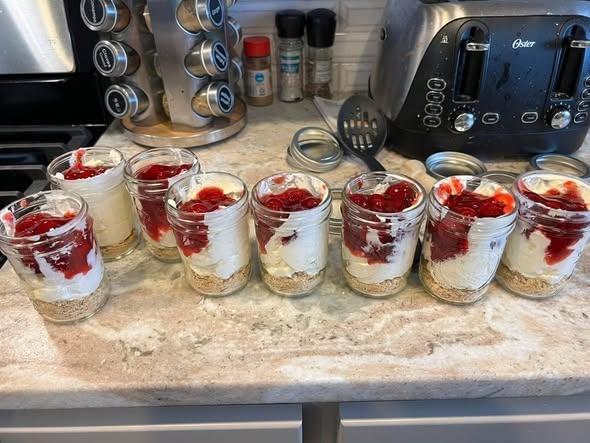
Spoon or pipe a layer of cheesecake filling over the graham cracker crust.
Add a spoonful of cooled cherry topping.
Then add another layer of cheesecake filling.
Finish with another spoonful of cherry topping.
You can make the layers neat and defined, or swirl the cherries slightly into the cheesecake for a more rustic appearance.
9. Chill
Cover the jars with their lids or plastic wrap.
Refrigerate for at least 3–4 hours.
For the best texture, let them chill overnight.
The cheesecake filling will become firmer and the flavors will blend beautifully.
🍒 10. Decorate and serve
Just before serving, add a small swirl of whipped cream.
Top with:
- A fresh cherry
- A sprinkle of graham cracker crumbs
- A little lemon zest
Serve chilled.
⭐ Tips for Perfect Cheesecake Jars
Use softened cream cheese. Cold cream cheese can leave lumps in the filling.
Use full-fat cream cheese. It gives the dessert a richer flavor and firmer texture.
Cool the cherry topping completely. Warm fruit topping can melt the cheesecake filling.
Don’t overwhip the cream. Medium-stiff peaks give the filling a smooth, creamy texture.
Pipe the filling for neat layers. A piping bag makes it much easier to create clean layers inside small jars.
🍓 Easy Variations
Chocolate Cherry Cheesecake
Replace about ¼ cup of the graham cracker crumbs with finely crushed chocolate cookies.
White Chocolate Cherry
Melt 3 oz (85 g) white chocolate, allow it to cool slightly, and fold it into the cream cheese mixture.
Oreo Cherry Cheesecake
Replace the graham crackers with crushed chocolate sandwich cookies.
Fresh Berry Cheesecake
Use strawberries, raspberries, blueberries, or a mixture of berries instead of cherries.
Almond Cherry Cheesecake
Add ½ tsp almond extract to the cheesecake filling. Cherry and almond are a fantastic combination.
🧊 Storage
Keep the cheesecake jars refrigerated.
They can be prepared up to 2 days ahead and kept covered in the refrigerator.
For the best texture, add the final whipped cream and fresh cherry garnish shortly before serving.
These are especially convenient for parties because each guest gets their own individual cheesecake jar—no slicing or serving required. 🍒🥄