
🍯🧄 Honey Garlic Glazed Chicken
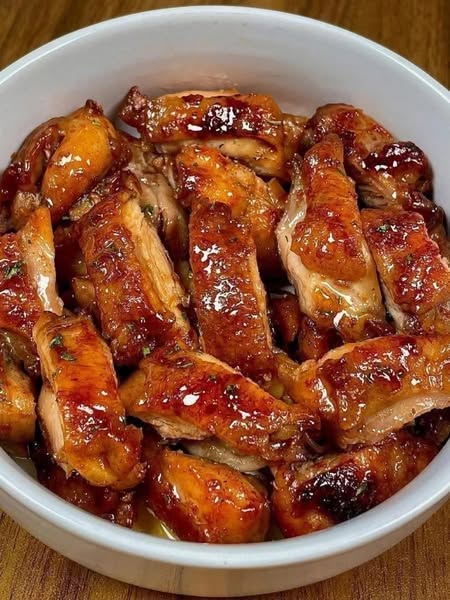
A big, juicy, restaurant-style honey garlic chicken recipe with tender chicken, plenty of fresh garlic, and a thick, glossy glaze. The sauce is sweet, savory, slightly tangy, and wonderfully sticky.
🍗 Recipe at a Glance
- Servings: 6
- Prep time: 15 minutes
- Marinating time: 20–30 minutes, optional
- Cook time: 25–30 minutes
- Total time: About 45–60 minutes
- Best chicken: Boneless chicken thighs
- Cooking method: Stovetop
🛒 Ingredients
For the Chicken
- 1½ kg (3.3 lb) boneless, skinless chicken thighs
- 1½ teaspoons salt
- 1 teaspoon black pepper
- 1 teaspoon paprika
- 1 teaspoon garlic powder
- 3 tablespoons cornstarch
- 3 tablespoons vegetable oil
For the Honey Garlic Glaze
- ¾ cup honey
- ½ cup soy sauce
- 10 cloves fresh garlic, finely minced
- 3 tablespoons ketchup
- 2 tablespoons brown sugar
- 2 tablespoons rice vinegar or fresh lemon juice
- 1 tablespoon oyster sauce, optional
- 1 tablespoon grated fresh ginger
- ½ teaspoon red pepper flakes, optional
- ½ cup chicken broth or water
For Thickening
- 1½ tablespoons cornstarch
- 3 tablespoons cold water
For Garnishing
- 2 tablespoons sesame seeds
- 3 green onions, thinly sliced
- Fresh cilantro, optional
- Extra red pepper flakes, optional
🍗 Step 1: Prepare the Chicken
Pat the chicken thighs thoroughly dry with paper towels.
Cut large thighs into roughly equal-sized pieces.
Place them in a large bowl.
Add:
- Salt
- Black pepper
- Paprika
- Garlic powder
- 3 tablespoons cornstarch
Toss until every piece is evenly coated.
The cornstarch gives the chicken a lightly crisp exterior and helps the glaze cling to the meat.
🍯 Step 2: Prepare the Honey Garlic Sauce
In a separate bowl, combine:
- ¾ cup honey
- ½ cup soy sauce
- 10 minced garlic cloves
- 3 tablespoons ketchup
- 2 tablespoons brown sugar
- 2 tablespoons rice vinegar
- 1 tablespoon oyster sauce
- 1 tablespoon grated ginger
- ½ teaspoon red pepper flakes
- ½ cup chicken broth
Whisk until thoroughly combined.
Taste the sauce before cooking and adjust if desired.
For a sweeter glaze, add another tablespoon of honey.
For more tang, add a little extra vinegar or lemon juice.
For more heat, add additional chili flakes.
🧊 Step 3: Optional Marinating
Pour approximately ⅓ of the sauce over the chicken.
Toss well.
Let the chicken marinate in the refrigerator for 20–30 minutes.
You can skip this step if you’re short on time.
Important:
Keep the remaining sauce completely separate from the raw chicken. You’ll use that sauce later for glazing.
🔥 Step 4: Heat the Pan
Place a large skillet over medium-high heat.
Add 3 tablespoons vegetable oil.
Allow the oil to become hot but not smoking.
For the best browning, cook the chicken in batches rather than overcrowding the pan.
🍗 Step 5: Brown the Chicken
Place the chicken pieces into the hot pan.
Cook for approximately 4–5 minutes on the first side.
Turn and cook another 3–5 minutes.
The chicken should become:
- Deep golden brown
- Slightly crisp around the edges
- Almost completely cooked
Remove the chicken and set it aside on a clean plate.
Repeat with the remaining chicken if necessary.
🧄 Step 6: Cook the Glaze
Reduce the heat to medium.
Pour the unused honey garlic sauce into the same skillet.
Use a wooden spoon to scrape up the browned bits from the bottom of the pan.
Bring the sauce to a gentle simmer.
Cook for approximately 3–5 minutes, stirring frequently.
The garlic will become fragrant and the sauce will begin reducing.
⚠️ Watch the heat
Honey contains a lot of sugar and can burn quickly.
Keep the sauce at a gentle simmer rather than a vigorous boil.
🥣 Step 7: Thicken the Sauce
In a small bowl, combine:
- 1½ tablespoons cornstarch
- 3 tablespoons cold water
Whisk until smooth.
Slowly pour the slurry into the simmering sauce while stirring constantly.
Cook for approximately 1–2 minutes.
The sauce should become thick, shiny, and glossy.
🍯 Step 8: Return the Chicken
Add the browned chicken back into the skillet.
Toss everything together.
Continue cooking for 3–5 minutes, turning the chicken frequently.
The glaze should cling to every piece.
You’ll know it’s ready when the chicken is completely coated in a thick, shiny layer of honey garlic sauce.
🌡️ Step 9: Check the Chicken
Check the thickest piece with an instant-read thermometer.
Chicken should reach at least:
165°F (74°C)
Chicken thighs can be cooked somewhat higher and often become particularly tender around 175–185°F (79–85°C).
✨ Step 10: Garnish
Turn off the heat.
Sprinkle the chicken with:
- Sesame seeds
- Green onions
- Fresh cilantro, if desired
- Extra chili flakes
Give the chicken one final toss.
🍚 Step 11: Serve
Serve the chicken immediately while the glaze is hot and sticky.
It’s fantastic over:
🍚 Rice
- Steamed white rice
- Basmati rice
- Jasmine rice
- Fried rice
🍜 Noodles
- Egg noodles
- Lo mein
- Chow mein
- Rice noodles
🥦 Vegetables
- Broccoli
- Green beans
- Bell peppers
- Carrots
- Snow peas
For the ultimate plate, serve honey garlic chicken over steamed rice with broccoli and extra sauce spooned over the top.
🌶️ Make It Spicy
For a spicy version, add:
- ½ teaspoon chili flakes — mild
- 1 teaspoon — medium
- 1½–2 teaspoons — hot
You can also add 1–2 tablespoons sriracha to the glaze.
🍊 Orange Honey Garlic Chicken
For a citrusy variation, replace 2 tablespoons of the chicken broth with fresh orange juice.
Add:
- 1 teaspoon orange zest
The orange works beautifully with the honey and garlic.
🍍 Pineapple Honey Garlic Chicken
Add 1 cup pineapple chunks during the final few minutes of cooking.
You can also replace some of the chicken broth with pineapple juice.
The result is a sweet, tangy, tropical-style chicken dish.
🥦 Honey Garlic Chicken & Vegetables
Turn this into a complete one-pan meal by adding:
- Broccoli florets
- Bell peppers
- Carrots
- Snow peas
Cook the vegetables separately or add them to the pan after the chicken is browned.
Then toss everything together with the finished glaze.
👩🍳 Important Tips
Use chicken thighs for juicy chicken
Thighs have more fat than breast meat and are much harder to dry out.
Don’t overcrowd the pan
Crowding traps moisture and prevents proper browning.
Use fresh garlic
Freshly minced garlic gives the sauce much more flavor than garlic powder.
Keep some sauce separate
Never reuse sauce that has touched raw chicken unless you cook it thoroughly. Preparing a separate portion for the final glaze makes the process safer and gives you a clean, flavorful sauce.
Don’t burn the honey
Once the glaze is added, moderate heat is your friend.
Don’t overcook the chicken
Use a thermometer rather than relying entirely on cooking time.
🧊 Storage
Allow leftovers to cool and refrigerate them in an airtight container.
They will keep for approximately 3–4 days.
To reheat, place the chicken in a skillet over medium-low heat with 1–2 tablespoons of water.
Cover and heat gently until warmed through.
❄️ Freezing
Cooked honey garlic chicken can be frozen for approximately 2–3 months.
Place cooled chicken in a freezer-safe airtight container or bag.
Thaw overnight in the refrigerator.
Reheat gently in a skillet and add a splash of water to loosen the glaze.
🍽️ Meal Prep
Divide the cooked chicken between meal-prep containers with:
- Steamed rice
- Broccoli
- Carrots
- Bell peppers
Store refrigerated and reheat when needed.
Keep extra sauce in a separate small container if you want the chicken to be especially saucy.
⭐ Final Result
You’ll have tender, golden chicken covered in a thick, glossy honey garlic glaze, with caramelized edges, loads of fresh garlic, a touch of tang, and optional chili heat.