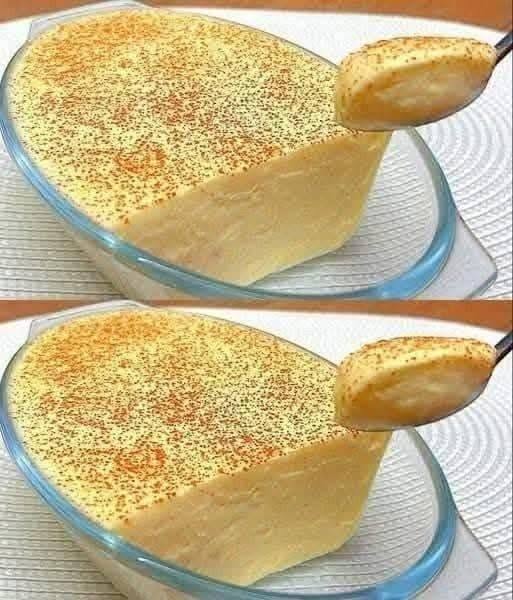

No-Bake Homemade Milk Pudding
Prep time: 10 minutes
Cook time: 10 minutes
Chilling time: 3–4 hours
Total time: About 4 hours
Servings: 6
This creamy homemade milk pudding is silky, rich, and incredibly easy to make. It doesn’t require an oven, eggs, or gelatin—the pudding thickens gently on the stovetop with cornstarch. Once chilled, it becomes smooth and spoonable with a delicate milky flavor.
You can enjoy it plain with a little cinnamon or vanilla, or dress it up with fruit, nuts, chocolate, caramel, or whipped cream.
Ingredients
For the pudding
- 4 cups (960 ml) whole milk
- ½ cup (100 g) granulated sugar
- 4 tbsp cornstarch
- 2 tbsp powdered milk, optional
- 1 tsp vanilla extract
- 2 tbsp heavy cream, optional
- 1 tbsp unsalted butter
- ¼ tsp salt
For serving
- Ground cinnamon
- Chopped pistachios or almonds
- Fresh berries
- Sliced banana
- Toasted coconut
- Whipped cream
- Chocolate shavings
- Caramel sauce, optional
Instructions
1. Combine the dry ingredients
Place the cornstarch, sugar, powdered milk if using, and salt in a medium saucepan.
Whisk them together thoroughly.
This step is important because it distributes the cornstarch throughout the sugar and helps prevent lumps later.
2. Add the cold milk
Slowly pour about 1 cup of the cold milk into the saucepan while whisking constantly.
Continue whisking until the cornstarch has completely dissolved and the mixture is smooth.
There should be no visible lumps.
Add the remaining milk and whisk again.
Starting with cold milk is important because cornstarch dissolves much more easily in cold liquid than hot liquid.
3. Cook the pudding
Place the saucepan over medium heat.
Cook while whisking frequently.
As the milk warms, the cornstarch will begin thickening the mixture.
This usually takes around 6–10 minutes.
Keep stirring, especially around the bottom and corners of the pan.
When the pudding begins to bubble gently and becomes noticeably thick, reduce the heat to low.
Continue cooking for about 1–2 minutes, whisking constantly.
You want a smooth, thick pudding that coats the back of a spoon.
Don’t cook it aggressively for a long time after it thickens, as excessive heat can give the pudding a slightly pasty texture.
4. Add the vanilla and butter
Remove the saucepan from the heat.
Immediately stir in the vanilla extract and butter.
If you’re using heavy cream, stir it in now as well.
The butter gives the pudding a smoother, richer finish, while the vanilla brings out the natural sweetness of the milk.
Whisk until everything is completely incorporated.
5. Strain for an extra-smooth pudding
For an especially silky texture, pour the hot pudding through a fine-mesh strainer into a clean bowl.
This removes any tiny lumps that may have formed during cooking.
This step isn’t strictly necessary, but it’s worth doing if you want a very smooth, dessert-shop-style pudding.
6. Portion the pudding
Pour the warm pudding into six small serving glasses, ramekins, or dessert bowls.
You can serve it in individual portions or place it in one larger serving dish.
If you don’t want a skin to form on top, press a piece of plastic wrap directly against the surface of the pudding.
7. Chill
Allow the pudding to cool at room temperature for about 15–20 minutes.
Then refrigerate for at least 3 hours.
For the best texture, chill it overnight.
The pudding will become firmer as it cools.
8. Garnish and serve
Remove the pudding from the refrigerator shortly before serving.
Top with your choice of cinnamon, chopped pistachios, fresh berries, whipped cream, or chocolate shavings.
For a simple traditional finish, a light dusting of cinnamon is all you need.
How to Get the Perfect Texture
The amount of cornstarch controls the final consistency.
For a soft, creamy pudding, use about 3½ tablespoons.
For a thicker pudding, use 4 tablespoons.
For a pudding firm enough to unmold, use about 5 tablespoons and chill it thoroughly.
If your pudding becomes too thick while cooking, whisk in a small amount of warm milk until you reach the consistency you want.
Chocolate Milk Pudding
For a chocolate version, add:
- 3 tbsp unsweetened cocoa powder
- ½ cup (85 g) semisweet chocolate chips or chopped chocolate
Whisk the cocoa powder into the dry ingredients before adding the milk.
Once the pudding thickens, remove it from the heat and stir in the chopped chocolate until completely melted.
Finish with vanilla and butter as usual.
The result is a rich, creamy chocolate pudding with a smooth texture.
Coconut Milk Pudding
Replace 1 cup of the whole milk with 1 cup full-fat coconut milk.
Add ½ tsp coconut extract if you want a stronger coconut flavor.
Top with toasted coconut flakes and chopped pistachios.
Strawberry Milk Pudding
Make the basic pudding and chill it completely.
Serve it topped with fresh strawberries and a spoonful of strawberry sauce.
For an extra fruity version, blend ½ cup strawberry purée into the finished warm pudding before chilling.
Cardamom Milk Pudding
Add ¼–½ tsp ground cardamom to the dry ingredients.
You can also add a few crushed cardamom pods to the milk while heating, then strain them out before serving.
Garnish with pistachios and a tiny pinch of cardamom.
Caramel Milk Pudding
Drizzle caramel sauce into the serving glasses before adding the pudding.
Pour the warm pudding over the caramel and refrigerate.
Before serving, add another drizzle of caramel and a pinch of flaky sea salt.
Tips for Smooth Pudding
Whisk constantly once it thickens
Cornstarch pudding can stick to the bottom of the pan surprisingly quickly.
Keep your whisk moving, especially during the final few minutes.
Don’t use high heat
Medium heat gives you much better control.
High heat can cause the milk to scorch on the bottom while the pudding thickens unevenly.
Use whole milk
Whole milk produces the richest and creamiest result.
You can use lower-fat milk, but the finished pudding will be slightly lighter and less luxurious.
Add vanilla at the end
Adding vanilla after removing the pudding from the heat preserves more of its aroma.
Strain if necessary
If you notice even a few lumps, strain the pudding while it’s hot.
Once it cools, those lumps become much harder to remove.
Storage
Cover the pudding and refrigerate it.
It is best enjoyed within 3–4 days.
Keep it refrigerated until serving.
If a skin forms on the surface, you can simply stir it into the pudding or peel it off before serving.
Simple Serving Idea
For an easy dessert that looks much more elaborate than it actually is, spoon the chilled milk pudding into small glasses and top each one with a pinch of cinnamon, chopped pistachios, and a few fresh berries.
The result is creamy, lightly sweet, and wonderfully comforting without requiring an oven or complicated ingredients.